MyBox and Home Assistant
MyBox is a line of sleek and smart BEV charging stations suitable for both home and public deployment. This post describes the steps necessary for integrating their Plus model (AC) into Home Assistant so that the wallbox can be monitored and controlled from this popular smart home platform.
I use the MQTT messaging protocol for getting data from and sending commands to the wallbox. Modbus TCP could be another option in the future but, while listed in the datasheet, it is currently reserved only for internal use. According to the vendor, it should be made available to customers “soon”.
MyBox Plus
Why did I choose the MyBox platform in the first place? Well, although it is more expensive than some of the competing products, it offers a lot of useful functionality. Yet even more important for me was that the company seems to be aiming at technological innovations, so hopefully more exciting functionality will come later through software and/or hardware upgrades. One feature that I’d certainly love to try is V2H (vehicle-to-home) or V2G (vehicle-to-grid) as per ISO 15118.
The low-end MyBox Home model would most likely suffice for our home BEV charging purposes. After some hesitation, I decided to go for the Plus model, mainly because of its modularity. Should any hardware component need to be replaced or upgraded, it will be much easier and cheaper to do with a modular design.
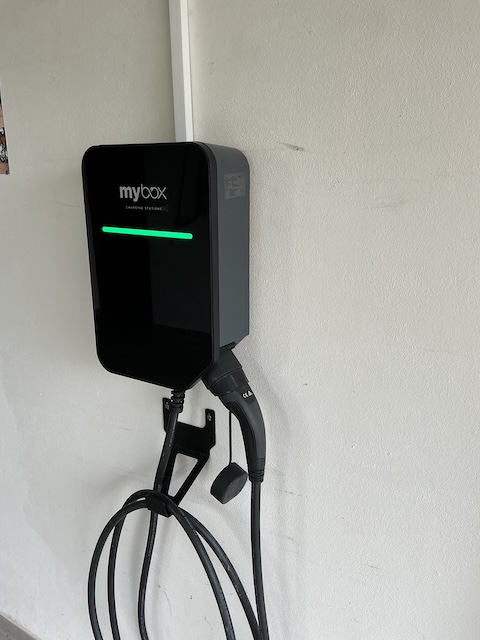
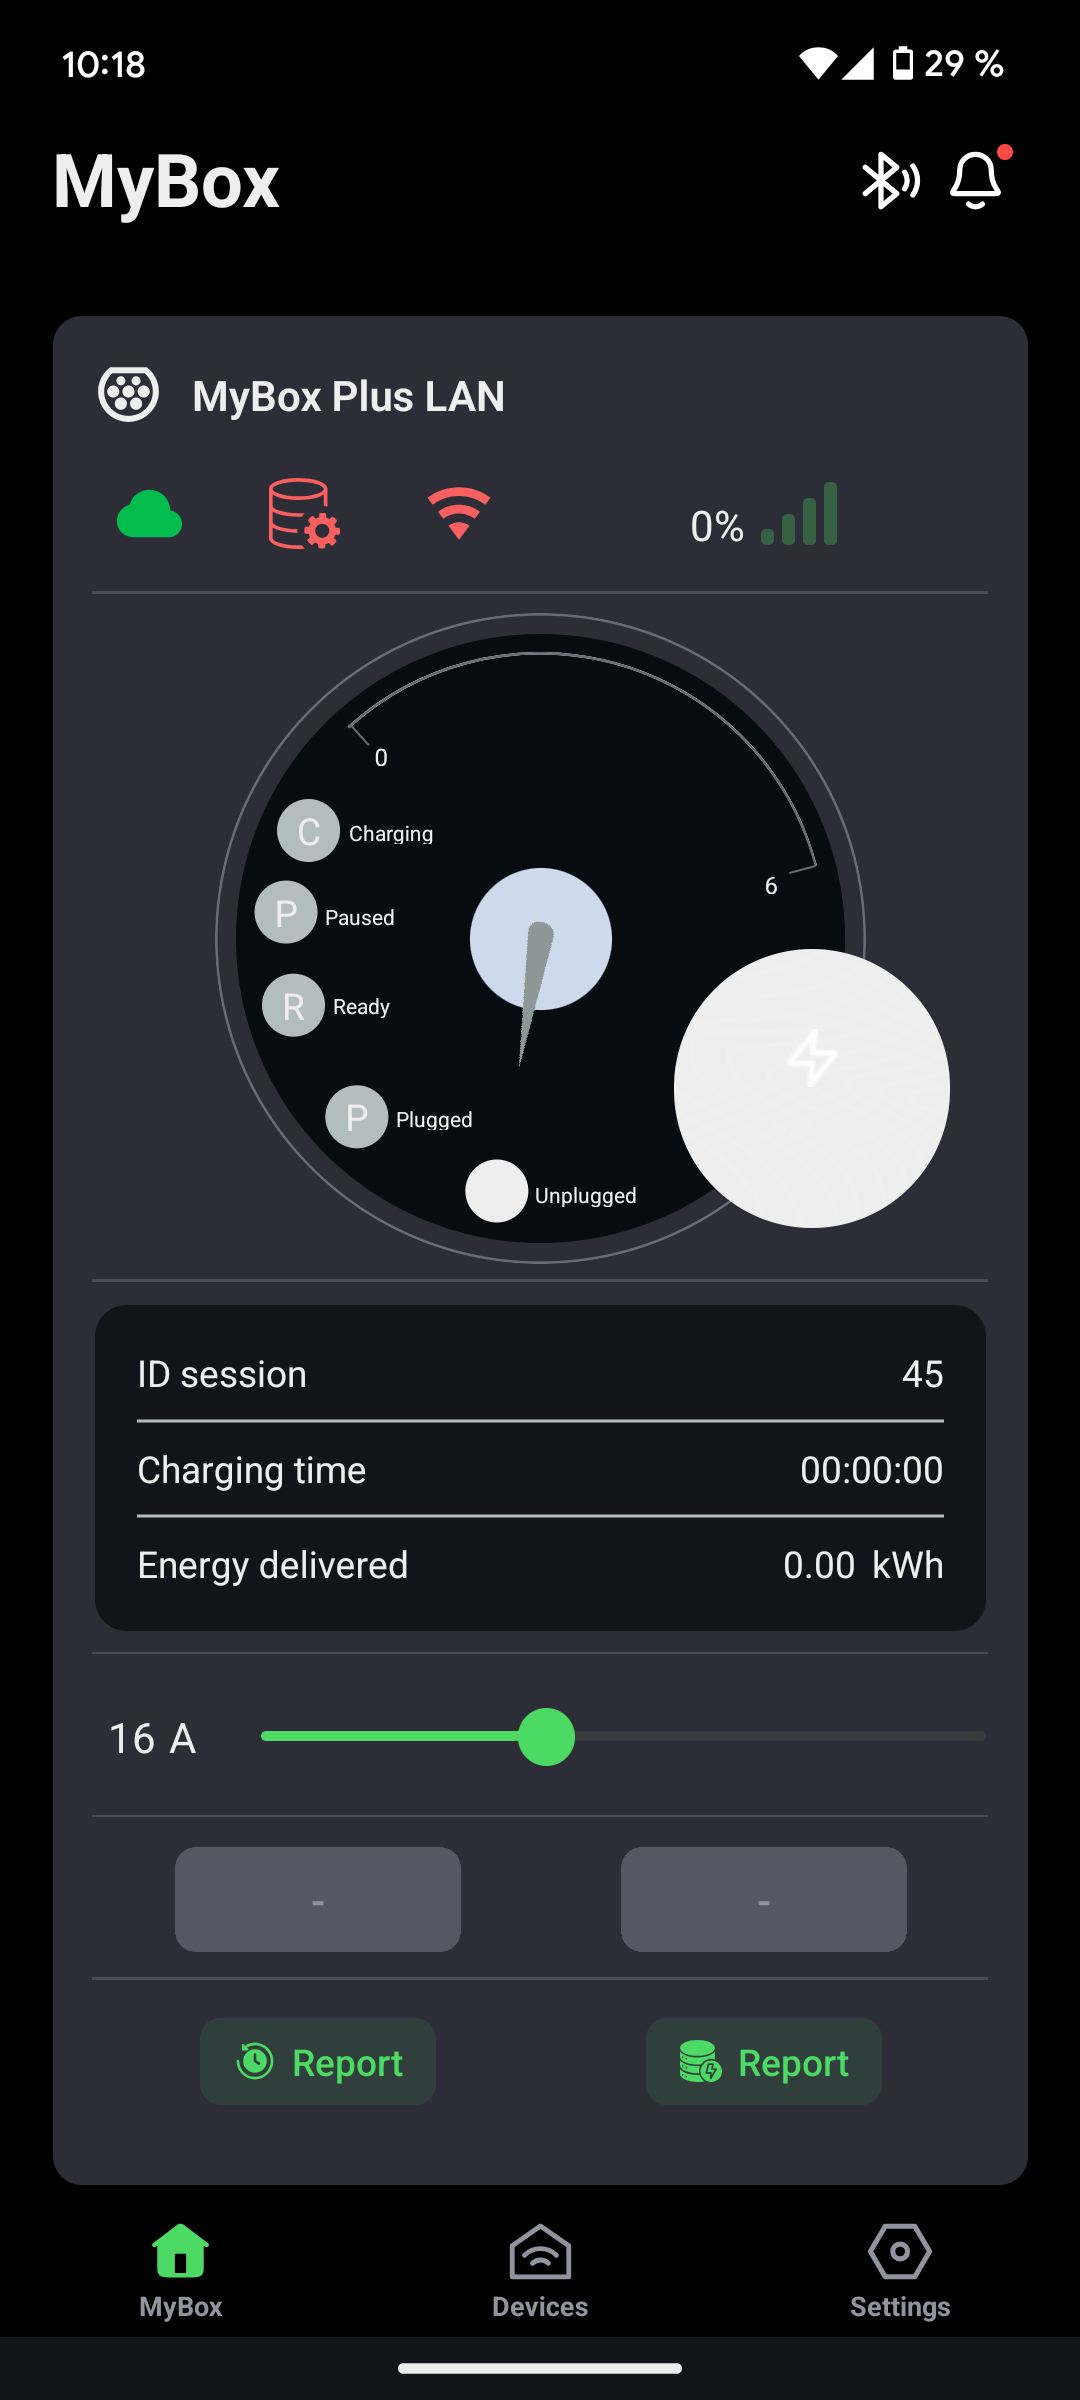
On the other hand, since the wallbox was going to be installed in a locked garage, we didn’t need the optional RFID card reader. For the same reason I chose the tethered variant (with a fixed Type 2 cable), as it is much more convenient to simply take the cable off the holder and plug it into the car.
Finally, I didn’t order the AC Sensor that can be used for adjusting wallbox charging power dynamically according to the current consumption of the household. I implemented such a control mechanism in Home Assistant, see my other blog post Adaptive BEV Charging with Home Assistant.
Preliminaries
In order to use MQTT in Home Assistant, MQTT integration needs to be added, and an MQTT broker also has to be set up. Actually, the latter is one of the extra functions implemented in the MyBox software, I haven’t tried it though. A natural choice for Home Assistant users is to use the Mosquitto broker add-on. Its installation and configuration is pretty straightforward, one just has to create a special Home Assistant account & password for use with the broker.
Another tool that I found quite handy is MQTT Explorer. It is an open-source MQTT client that makes it very easy (apart from other functions) to inspect MQTT data hierarchy. Some examples will be given below. MQTT Explorer is available for Windows, MacOS and Linux.
Enabling MQTT in MyBox
The local MQTT function isn’t turned on by default. To configure it, I first needed to obtain access to the MyBox cloud portal, where the configuration of the wallbox can be viewed and changed. I received the necessary credentials directly from the technician who did the wallbox installation.
After logging into the portal and opening the device configuration, I scrolled down to the local_mqtt section, enabled it and filled in the parameters of my MQTT broker. The configured web form looks like this:
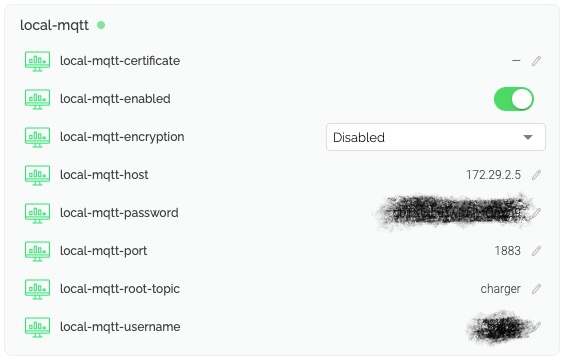
The two items that are masked out are the user name and password chosen for the Mosquitto broker user in Home Assistant. The local-mqtt-host parameter is the IP address of my Home Assistant server with Mosquitto broker. It is also necessary to configure the MQTT root topic. I chose charger, but anything reasonable can be used instead.
In my case, the Home Assistant server can be accessed only from the local network, so I don’t need encryption and certificates.
Verifying the communication
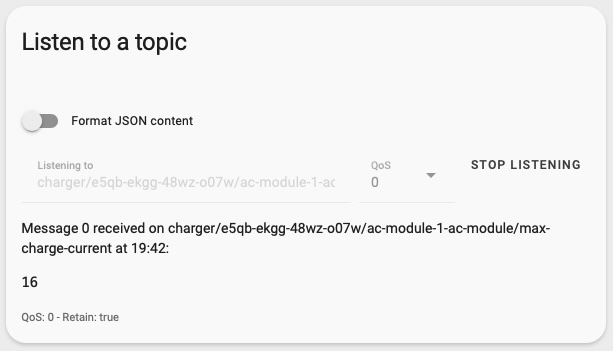
From the configuration page of the MQTT integration in Home Assistant, I was able to view and change wallbox parameters via MQTT. For example, in the box Listen to a topic I could specify the topic
charger/e5qb-ekgg-48wz-o07w/ac-module-1-ac-module/max-charge-currentand after pressing the START LISTENING button, the value of maximum charge current immediately popped up as seen in Figure 3 (a).
The leftmost level in a topic (charger) is the root topic configured in the cloud portal (see above). Immediately following is the device ID of my wallbox that can also be found in the portal.
It is also possible to dump all (a few dozen) parameters at once by using a wildcard topic with the hash symbol #, for example charger/#.
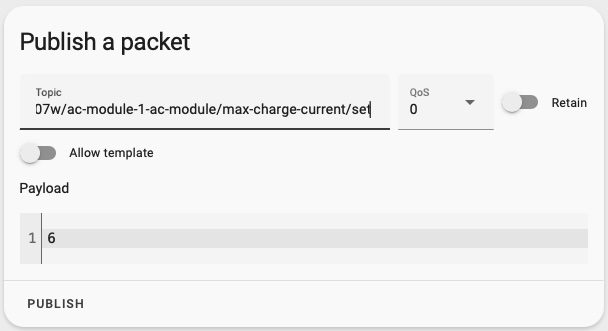
Similarly, I was able to change a writable parameter by sending a new value with /set appended to the corresponding topic name. An example for the max-charge-current parameter is in Figure 3 (b). In the MyBox mobile app (Figure 1 (b)) we can immediately verify that indeed the maximum charge current is now 6.
Configuring Home Assistant sensors and scripts
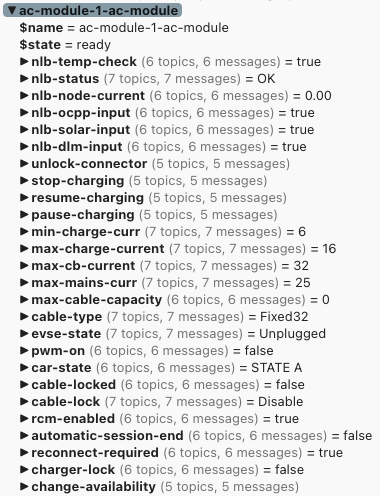
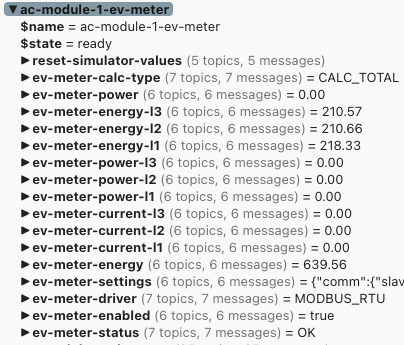
With MQTT properly working, I used MQTT Explorer for connecting to the Mosquitto broker running on my Home Assistant server, and started browsing the MQTT tree of the wallbox. I then selected topics from the following two subtrees (both with the charger/e5qb-ekgg-48wz-o07w/ prefix) for defining Home Assistant sensors and scripts, namely
ac-module-1-ac-module– status and charging-related settings of the wallbox, see Figure 4 (a).ac-module-1-ev-meter– data about power output and energy consumption, see Figure 4 (b).
ac-module-1-ac-module subtree
ac-module-1-ev-meter subtree
Home Assistant sensors and binary sensors that monitor specific MQTT topics are defined in the mqtt section of Home Assistant configuration. I have them in a separate file mqtt.yaml, which is included in the main configuration file:
configuration.yaml
mqtt: !include mqtt.yamlSensors are configured in the sensor subsection. For instance, the sensor for maximum charge current is defined as follows:
mqtt.yaml
sensor:
  - name: "MyBox max charge current"
    icon: "mdi:current-ac"
    unique_id: "e7446234-e557-4135-9117-3b9b6db3c0df"
    unit_of_measurement: "A"
    state_class: measurement
    state_topic: >-
      charger/e5qb-ekgg-48wz-o07w/ac-module-1-ac-module/max-charge-current
Similarly, binary sensors appear in the binary_sensor subsection, for example
mqtt.yaml
binary_sensor:
  - name: "MyBox cable locked"
    icon: "mdi:ev-plug-type2"
    unique_id: "f010644a-8e6f-4811-94b1-7a75fa05f7d2"
    state_topic: >-
      charger/e5qb-ekgg-48wz-o07w/ac-module-1-ac-module/cable-locked
    payload_on: "true"
    payload_off: "false"
Scripts can be used for implementing various actions such as changing a parameter value or pausing/resuming/stopping a charging session. This script changes the value of maximum charge current:
scripts.yaml
mybox_set_max_charge_current:
  alias: "Set the maximum charge current"
  description: >-
    Set the maximum charge current for MyBox.
  icon: "mdi:current-ac"
  fields:
    value:
      name: "Max charge current value"
      selector:
        number:
          min: 6
          max: 16
          step: 1
          unit_of_measurement: "A"
          mode: slider
  sequence:
    - action: mqtt.publish
      data:
        topic: >-
          charger/e5qb-ekgg-48wz-o07w/ac-module-1-ac-module/max-charge-current/set
        payload: "{{ value }}"
And the following script pauses the charging session:
mqtt.yaml
mybox_pause_charging:
  alias: "Pause charging"
  description: >-
    Pause EV charging from MyBox.
  mode: single
  sequence:
    - action: mqtt.publish
      data:
        topic: >-
          charger/e5qb-ekgg-48wz-o07w/ac-module-1-ac-module/pause-charging/set
Complete contents of configuration files that I currently use for MyBox as well as other technical details can be obtained from GitHub.
Conclusions
MyBox Plus is a nice piece of hardware with rich software functionality. I’ve been using it regularly for overnight charging at 11 kW (the wallbox supports up to 22 kW) with no issues whatsoever.
My only complaint is that I cannot enforce single-phase operation: if a car has a three-phase onboard charger, then MyBox will feed it over three phases. This doesn’t look like a limitation, but it prevents me from using MyBox in the mode of using only excess energy from our photovoltaic system – its minimum charging power is 4.1 kW (3 × 6 A), which is very close to the peak PV production at optimal conditions, so there is essentially no space for power regulation. Therefore, I ended up using my older EcoVolter portable wallbox for excess-energy charging because it can be switched to single-phase operation and thus go with the charging power down to 1.4 kW (1 × 6 A). I plan to write another blog post about integrating this wallbox to Home Assistant and using it in the excess-energy mode.
But back to MyBox: integrating it to Home Assistant via MQTT and YAML configuration turned out to be pretty easy and perfectly sufficient for our purposes. It might make sense to write a full-fledged HA integration in Python, but I guess I am not in the right position to do it, as I don’t have some of the interesting hardware modules (RFID card reader, AC sensor) and don’t use any security-related functions. Potential developers of such an integration would also appreciate more extensive technical documentation, which is currently rather scarce.
Acknowledgment: I am grateful to Tomáš Kada, product specialist at MyBox, who helped me with setting up MQTT and promptly responded to all questions that I had.